
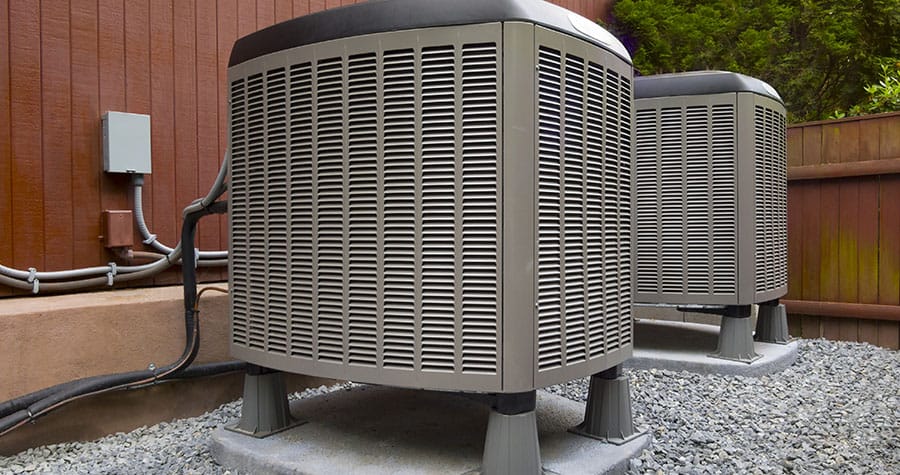
HVAC and heat pump capacitors have a long lifespan of over ten years. Their function is to store energy and provide it to heat pump components like the compressor to start. If it starts malfunctioning, the compressor won’t start and the heat pump won’t throw warm air. There are various reasons for a heat pump not blowing warm air, so get help from heat pump repair services to know the cause of the problem. Once you know it’s the start or run capacitor, perform the replacement.
Precaution
Replacing a capacitor in your heat pump unit is fairly easy if you don’t mind spending some time figuring out how to do it. But bear in mind that a start capacitor holds an electric charge and if you disconnect it without discharging it first, there is a risk of electric shock. Read the section in the blog to learn how to discharge a capacitor.
Moreover, make sure you’re wearing insulated gloves, a hat, and the tools you’re using are also insulated and not damaged.
Turn Off The Power Supply To The Unit
The step is to turn off the power. Usually, ACs and heat pumps have a separate fuse that you can switch off. This is located in the box near the condenser unit or in the breaker box in your basement or garage.
If the thermostat runs on its own battery and doesn’t turn off with the unit, turn it off as well Because it can send low-voltage current to the capacitor.
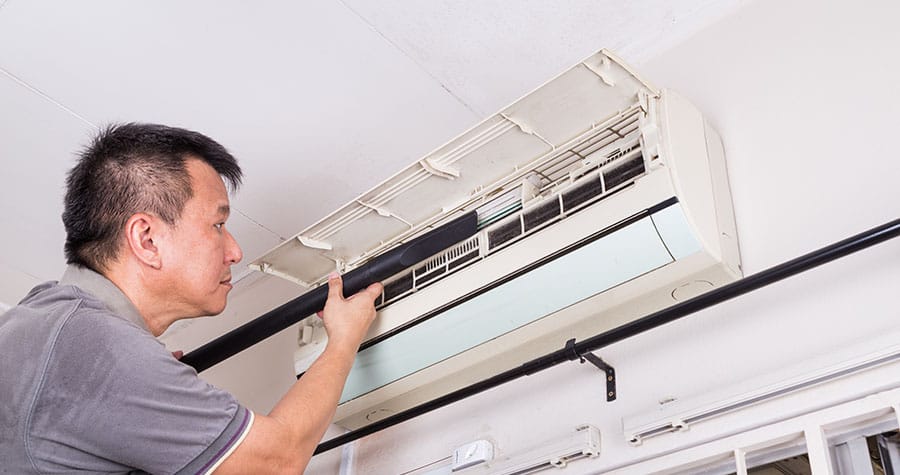
Locate And Remove The Panel Cover
The capacitor is inside the panel cover. So, observe the condenser unit and find the side panel by checking the corner. Unscrew the panel cover with the right screwdriver. Keep the screws safe to avoid losing them.
Locate The Capacitor (Don’t Touch It)
Once you have removed the side panel, you will see small components and some wires. Look for a round, cylindrical component. It is the capacitor of your heat pump. But don’t touch it because it holds current and can cause an electric shock.
If you’re not sure that the capacitor is faulty, inspect the upper part of the capacitor. It has three terminals on top and a flat surface under them. If the top of the capacitor has bulged upwards, it is failing and you should carry on the replacement process.
Note The Wires Arrangement
Take a picture from your phone as a reference to remember which wire was attached to which terminal.
Discharge The Capacitor
Wear your insulated gloves if you haven’t yet. Also, check the handle of your screwdriver. Make sure it’s insulated. Now, we need to create a bridge between the C terminal and the FAN terminals. Use your screwdriver to touch the C terminal and FAN terminal at the same time. Beware that it may create current. Perform the bridging process three times in total to completely discharge the capacitor.
Remove The Capacitor
A bracket will be securing the capacitor in place. Unscrew it and remove it. After this, disconnect the wires. These wires might not be risky to touch but to be safe, treat them as live wires. Don’t touch them with your bare hands and use a tool to remove them from their terminals.
Buy A New Start Capacitor
Different HVAC systems may have different sizes of capacitors. If you don’t know which capacitor is needed for your heat pump, take out the existing capacitor with the above steps and show it to the salesman at a local HVAC supplies store.
Fit The New Capacitor
All you need to do is reverse the steps you did in the first stage of this process. Place the capacitor in place, put its bracket on it, and tighten its screws. Take help from the picture you took and connect the wires to the correct terminals.
Test The Capacitor
Allow power supply to the heat pump by turning on the breaker. Check if the heat pump is working and the compressor is turning on.
If it’s working, turn off the power supply, and fit the panel cover back in its place. Turn on the power again.
Conclusion
You can save some money by replacing the run capacitor of your heat pump yourself. But if the process is confusing, consult HVAC companies McLean to have a technician help you out. airone


